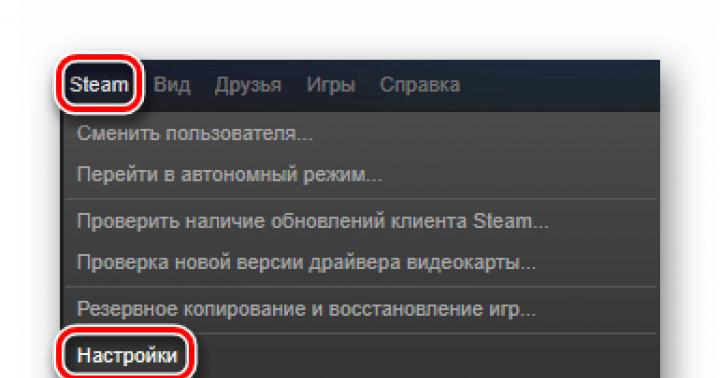
How to connect a mixer?


The creativity of modern musicians, and especially those who use musical electronics in their work, is difficult to imagine without the use of various equipment for sound processing. They are used to improve the process of music creation, making it as convenient, perfect and universal as possible. It is for these purposes that musicians and people of other professions who work with sound connect mixing consoles to the computer. These devices provide many new possibilities when working with sound. How to connect the mixer to the computer correctly will be discussed further.
How to connect a mixer: basic methods
Before connecting the mixer to the computer, you should familiarize yourself with the design features of the mixer that will need to be connected - find on its rear panel all the inputs and connectors and cables suitable for them, find out their names and purposes. This will help speed up the connection process. It is best to read about how to set up a mixer in the instructions for each specific device, since the specific settings may depend on the characteristics of its device.
As for the connection methods, they will be the same for all mixer models. Namely:
- If you connect the mixer through its line input (with its corresponding Line In cable), the computer will become the audio source. If the connection is made correctly, the computer will give a stereo signal to one of the channels. The article describes how to turn on the mixer correctly.
- To record music via a computer, the mixer must be connected to the computer connector via the “Master” or “Booth” outputs. This should be done using a cable with a 3.5 stereo jack on one end and two RCA connectors on the other, using the same line input.
- If your computer has a multi-channel sound card, then it makes sense to use it to connect two mixer channels and two stereo signals. In this case, the quality of the sound mixing produced on the computer will be much higher.
- You can change the parameters of computer programs when working with sound through a mixer only if the mixer has a USB output or if it supports “midi”.
To avoid problems connecting the mixer, you should use high-quality mixing consoles from well-known, well-established manufacturers.
When mixing, you may get the feeling that the results you achieve are somehow different from professional ones. Professionally mixed sound can be perceived as more powerful and expressive. One of the reasons for these differences is the compression tools used by professionals during audio production. Compressors can act as limiters that prevent signals from becoming too loud, but they can also shape the volume of certain sounds themselves. The result of this may be increased sound pressure and, as a result, a feeling of excessive aggressiveness of the sound. In this regard, when working with a compressor, it is necessary to regulate a whole set of parameters (in particular, compression depth and attack speed), and if the operator is not knowledgeable in this, the sound may be perceived as “crumpled”, not creating the effect of presence.
The MGP32X mixing console features a single-knob compressor designed so that even an inexperienced user can automatically adjust parameters to suitable levels by simply turning a knob. Practice applying the compressor to the pedal and snare drums. Applying a compressor to a bass guitar or electric guitar can also improve the sound of the instruments.
Turning the compressor with one control clockwise increases the volume level. Please note that applying too much compression may cause acoustic feedback. To compensate, if necessary, lower the channel fader slightly.
By following this step-by-step guide, you can connect your mixing console in half an hour maximum. To do this, we need the device itself, a computer or laptop, and a cable to connect them.
First of all, we supply electricity to the device, so pay attention to what the power supply plug looks like. Most more or less new mixers have a European type, so you will need an adapter to connect to the network. This is how it looks in the picture: Next, select the cable. The one we need has two “Jack” type plugs extending from the remote control, and one “minijack” to the PC sound card (1\4 and 1\8 inch connectors, respectively). We connect large “Jacks” to linear inputs (look for the inscription Line\Mono). When buying in a store, think about how long the cord should be in order to comfortably work with both devices in any conditions. Usually the seller is able to order the wire of the required size and dimensions. There we are also looking for an XLR cable to connect the mixer and microphone with female-male connectors. The microphone jack in the majority of laptops is located on the side panel, less often on the back panel. On a computer, this is the output of the sound card, indicated by the corresponding image (look at the picture). It includes a minijack pin.


It is worth noting that instructions for many mixing consoles can be downloaded on the Internet. They contain a detailed description of how to connect your specific model, as well as ways to solve common errors. Therefore, if the mixer does not want to work, you can contact the manual on official or amateur sites.
In the traditional sense, a mixer is a single hub to which all studio equipment is connected, which is why the mixing console is rightfully considered the heart of the studio. Despite the fact that many musicians prefer working with a computer, the advantages of a mixing console are undeniable. Of course, working with software is somewhat more cost effective and sometimes more convenient, but still the lack of tactile sensations of working with a real device significantly affects the motivation of a sound producer or sound engineer.
Introduction
To create a full-fledged setup, the mixer will be the key link; it is recommended to purchase it first if you have a large number of instruments. Today the market offers a large selection of mixing consoles, different in functionality and form factor.
The mixing console was originally designed for use in studio settings or during live performances. However, over time, "universal" mixers have emerged that can be used in a wide variety of situations. And yet, no matter what you choose a mixer for, it is important to try to provide for possible further use. The number of inputs and outputs is one of the key characteristics worth paying attention to. A little hint - it’s better to have a couple extra than not enough.
The input section of a mixer is usually represented by microphone or line balanced XLR connectors, unbalanced line jack inputs, or combined variations thereof. The following elements take place on each input channel: preamplification (gain), equalization and sends to additional buses (aux). The output section generates all the information from the mixer channels, which can be sent to the main stereo output (Main Out). There are also "groups" or shared buses where multiple channels can be combined to create a sub-mix. All channels in a group will be controlled by one fader.
Types of mixers

Many sound producers prefer serious analog mixers, for which there are 2 explanations: warm sound and a simple, intuitive interface. The similarity of the interfaces allows the user to quickly understand the controls of the new mixer model. The sound of an analog EQ is hard to miss, which is why engineers spend long hours trying to emulate the same sound on digital systems.
For serious concert activities, medium and large venues, rentals, medium-budget studios - digital or analog consoles.
For serious studio work - analog consoles with a characteristic sound (SSL, Neve, Trident, Avid, Toft Audio, API and the like).
If you already have a mixer, then the next question arises - is it enough to connect the mixer to the computer?
There are several connection methods using various adapters and external sound cards.
We will connect the mixer using a cable with two Jack connectors (6.35mm - 1/4 inch) and one mini-jack (3.5mm - 1/8 inch), which is the same size as the headphones in the player.
So, let's move on from the introductions to the connection process.
Connecting the cable to the mixer and computer
1. Since I received the Behringer Xenyx 502 mixer in the mail before the power adapter, I had time to set its settings.

(Picture 1)
Where the first 5 adjustment knobs in the first row relate to the microphone and are labeled with the number 1 at the bottom.
Second row, first two, to entrances 2/3.
Second row, third and fourth to entrances 4/5.
As I assume, everything that is wired for the microphone belongs to the R and L outputs.
If you twist the settings, then instead of a stereo signal there will be a mono signal, and you can also turn on an extra effect.
Therefore, you can simply copy the initial settings, and then explore the settings of your mixer yourself.
(Figure 4)
It's easy to see that the hardest part about connecting a mixer is finding the right cable to connect it to.
If you have another cable, you can use an adapter in the form of a 6.35mm connector with an input for connecting a 3.5mm connector.
Checking work
The point of checking the operation of the mixer is that the initial question arises - was it worth buying the mixer at all?
Was it possible to buy a microphone and not worry about it?
We will also check that the mixer is connected correctly to make sure everything is working.
4. Connect a condenser microphone.

(Figure 5)
5. The Windows 8 operating system reports that the new device is ready for use.

(Figure 6)
6. Open the “Film Studio” program to record the voiceover.
6.1. Add a photo or video.
6.2. Click the “Record voiceover” button.

(Figure 7)
6.3 Click the “Record” button.

button - record
(Figure 8)
7. Record the sound and make sure that the microphone and mixer are working.

(Figure 9)
The result of recording a video with voice-over text.
A condenser microphone that was connected to a mixer with phantom power was detected in the computer without any problems.
If you still have questions, I recommend reading the article about connecting a mixer to a laptop; use the opportunity to ask questions in the comments.
As for how much the mixer, cables and microphone cost, their cost will vary depending on delivery conditions and the seller's current prices.
The article described the Behringer Xenyx 502 mixer and B1 microphone. My feedback in this case is positive. I would also like to know your feedback.